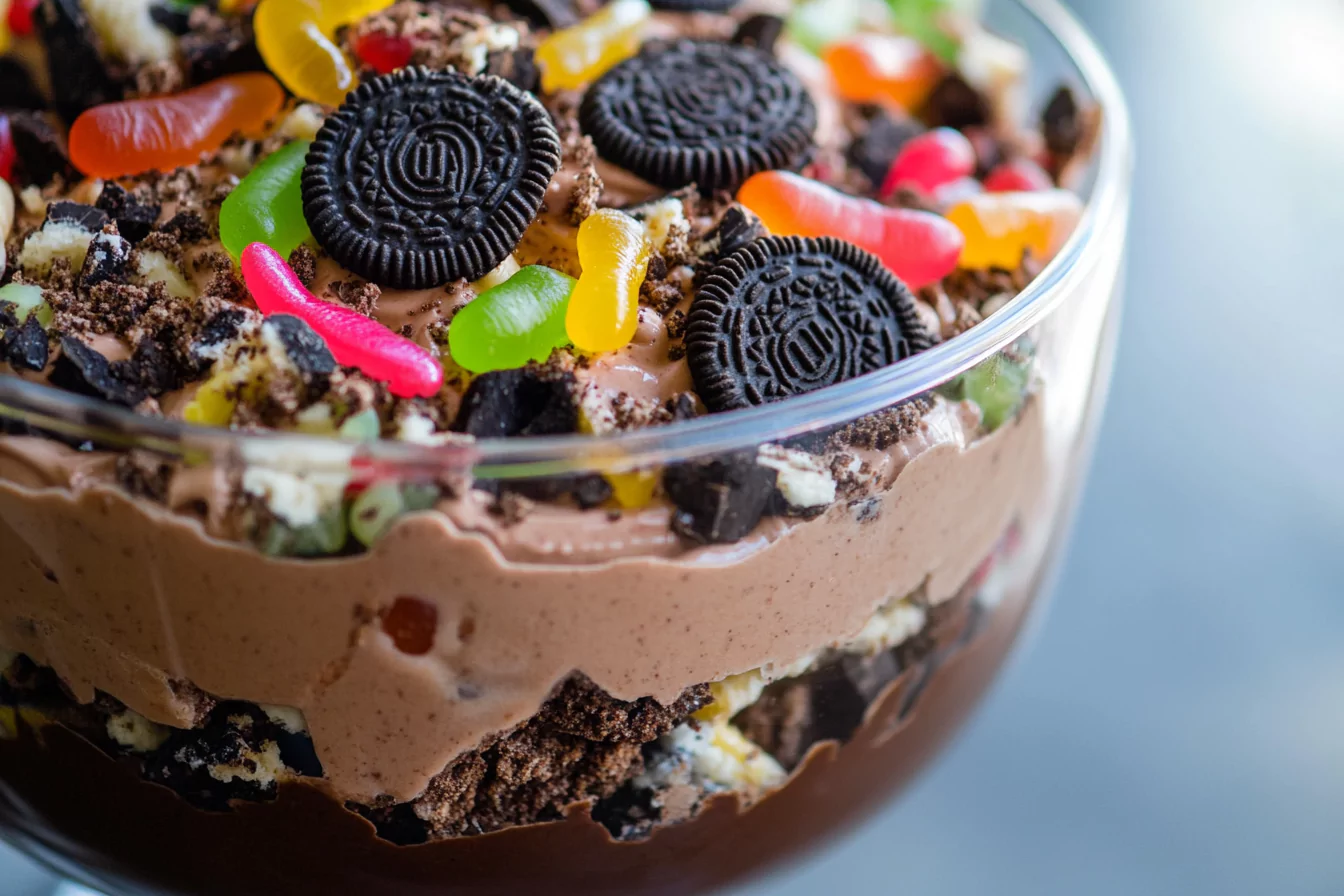
Dirt pudding is a classic dessert that combines the creamy decadence of pudding with the nostalgic crunch of crushed cookies. Often topped with gummy worms, this no-bake treat is a hit for kids’ parties, potlucks, or whenever you need a quick dessert that’s as fun as it is tasty.
In this article, we’ll explore everything you need to know about making the perfect dirt pudding. From its history to pro tips for nailing the texture, we’ll also tackle FAQs like fixing runny pudding and making boxed pudding taste better. Plus, we’ll share fun variations to impress your family and friends. Let’s dive in!
What is Dirt Pudding
Understanding the Classic Dirt Dessert
Dirt pudding, also called “dirt cake,” is a no-bake dessert made with layers of chocolate pudding, crushed cookies (usually Oreos), and playful gummy worms. It resembles a garden’s dirt bed, making it a whimsical treat perfect for themed parties.
This dessert is beloved for its ease of preparation and the versatility it offers. You can make it in individual cups for easy serving or a large bowl for a crowd-pleasing centerpiece.
The Origins of Dirt Pudding
While the exact origins are unclear, dirt pudding gained popularity in the United States during the 1980s and 1990s. Its charm lies in its simplicity and resemblance to “worms in dirt,” a concept that delights children and evokes laughter among adults.
Why This Recipe Stands Out
Unlike traditional dirt pudding recipes, this version focuses on a balance of creaminess and crunch while offering tips to prevent common issues like runny pudding. It’s customizable, allowing you to experiment with flavors and toppings for a unique spin on this classic treat.
Ingredients for the Perfect Dirt Pudding
Essential Ingredients List
To make the perfect dirt pudding, you’ll need these key ingredients:
- Chocolate Pudding Mix: Choose a high-quality boxed pudding mix for a rich, creamy base. Brands like JELL-O or Godiva work wonderfully.
- Milk: Whole milk is ideal for achieving a creamy texture, but you can also use 2% milk.
- Crushed Chocolate Cookies: Oreos are the classic choice. Crush them into fine crumbs to mimic the “dirt.”
- Cream Cheese: Adds a tangy richness that elevates the flavor.
- Powdered Sugar: Sweetens the cream cheese layer without making it grainy.
- Whipped Topping: Such as Cool Whip, to make the dessert light and fluffy.
- Gummy Worms: For that iconic look and playful texture.
Optional Add-ins for Personalization
- Peanut Butter: Swirl it into the pudding for a nutty twist.
- Shredded Coconut: Toasted coconut can resemble straw or grass, adding texture and flavor.
- Chopped Nuts: Pecans or almonds for added crunch.
- Candy Rocks: These edible decorations enhance the “garden soil” theme.
Best Brands for Creamy Results
For the best results, opt for trusted brands that ensure consistency:
- Pudding: JELL-O, Godiva, or Royal pudding mixes.
- Cookies: Oreo Original or Golden Oreos for a different look.
- Whipped Topping: Cool Whip for easy incorporation, or make homemade whipped cream for a fresher flavor.
Pro Tip
If you prefer a homemade touch, you can make chocolate pudding from scratch using cocoa powder, sugar, cornstarch, and milk. It’s an extra step but worth the effort for a richer taste.
Step-by-Step Guide to Making Dirt Pudding
Prepare the Pudding Base
- Mix the Pudding: In a large mixing bowl, whisk the chocolate pudding mix with cold milk according to the package instructions. Whisk for 2-3 minutes until the mixture thickens. Let it sit for 5 minutes to fully set.
- Enhance the Flavor: To make the boxed pudding taste even better, fold in a splash of vanilla extract or a pinch of instant coffee granules. This adds depth and richness to the flavor.
Make the Cream Cheese Layer
- Blend Ingredients: In another bowl, beat softened cream cheese with powdered sugar until smooth.
- Incorporate Whipped Topping: Gently fold in the whipped topping to lighten the mixture. This layer will provide a creamy contrast to the pudding and cookie crumbs.
Crush the Cookies
- Prepare the “Dirt”: Place chocolate sandwich cookies (Oreos) in a resealable plastic bag. Use a rolling pin to crush them into fine crumbs. Alternatively, use a food processor for quicker results.
- Reserve Some Crumbs: Set aside a small portion of the crumbs for topping.
Layer the Dirt Pudding
- First Layer: Spread a layer of the chocolate pudding mixture on the bottom of your serving dish or individual cups.
- Second Layer: Add a layer of the cream cheese mixture, smoothing it out evenly.
- Top with Cookies: Sprinkle a generous layer of crushed cookies over the cream cheese layer.
- Repeat Layers: Continue layering until the dish is full, ending with a layer of cookie crumbs on top.
Decorate and Chill
- Add Gummy Worms: Arrange gummy worms on the top layer of “dirt.” Let them peek out for a playful effect.
- Chill the Dessert: Cover the dish with plastic wrap and refrigerate for at least 2 hours. This allows the flavors to meld and the dessert to set.
Pro Tips for Perfect Texture and Presentation
- Use chilled bowls and utensils to keep the pudding smooth and creamy.
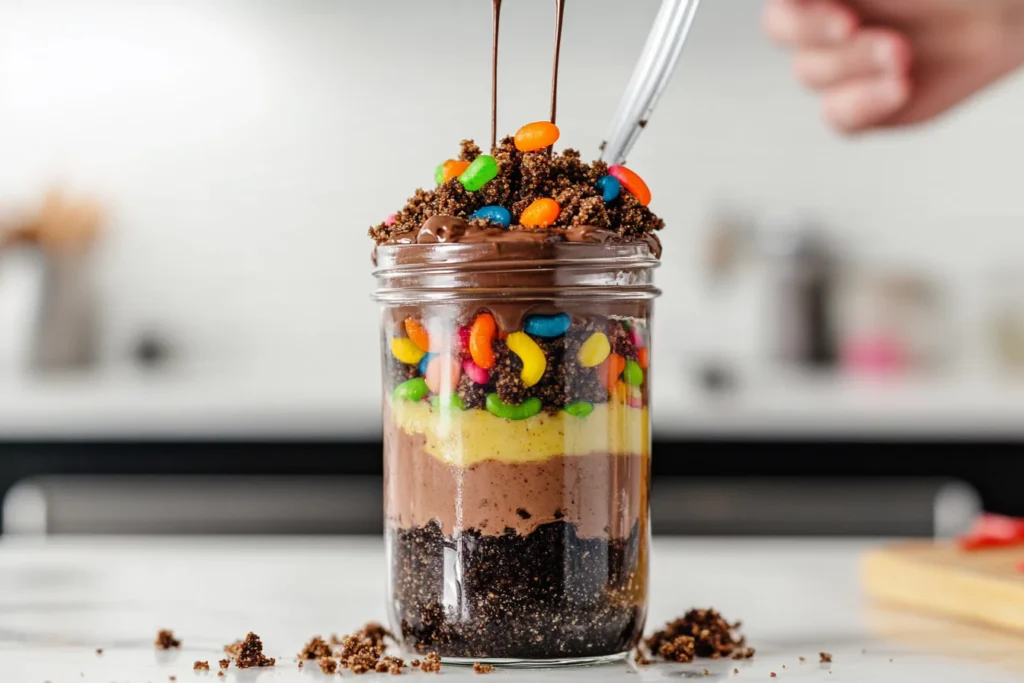
- Serve the dessert in small mason jars for a charming individual presentation.
- Add edible flowers for a garden-themed aesthetic.
How to Fix Runny Dirt Pudding
Common Reasons for Runny Dirt Pudding
- Incorrect Pudding-to-Milk Ratio: Using too much milk when preparing the pudding mix can result in a watery consistency.
- Overmixing or Undermixing: Overmixing can break down the structure of the pudding, while undermixing can leave it lumpy and loose.
- Insufficient Chilling Time: Dirt pudding needs adequate time in the fridge to set properly. Skipping this step can lead to a runny dessert.
Quick Fixes for a Firmer Pudding
- Add More Whipped Topping: Gently fold in additional whipped topping to thicken the mixture. Be careful not to overmix, as this can deflate the fluffiness.
- Incorporate Instant Pudding Mix: Sprinkle a small amount of instant pudding mix into the prepared pudding. Stir until it begins to thicken.
- Chill Longer: If the dessert is slightly runny, allow it to chill for an extra 1-2 hours. This helps the ingredients firm up.
Pro Tips for Avoiding Runny Pudding
- Measure Precisely: Follow the instructions on the pudding mix package for the exact milk-to-powder ratio. Use measuring cups for accuracy.
- Use Whole Milk: Whole milk adds richness and helps the pudding achieve a thicker consistency compared to lower-fat alternatives.
- Layer Carefully: Ensure each layer is spread evenly without disturbing the others. Uneven layers can create a soupy result.
Bonus Tip
If the dessert still feels too soft, serve it as a pudding parfait instead of trying to firm it further. It’s just as delicious and saves the day!
Enhancing Boxed Pudding for Better Taste
Tricks for Richer Flavor
- Use Half-and-Half Instead of Milk: Replace regular milk with half-and-half or a combination of milk and heavy cream for a thicker, creamier pudding.
- Add Vanilla Extract: A splash of pure vanilla extract can elevate the flavor, making it taste more homemade.
- Mix in Melted Chocolate: Stir in a small amount of melted semi-sweet or dark chocolate for an indulgent upgrade.
Creative Additions for Extra Yum
- Instant Coffee Granules: A pinch of instant coffee amplifies the chocolate flavor without making it taste like coffee.
- Peanut Butter Swirls: Mix a few tablespoons of creamy peanut butter into the pudding for a nutty twist.
- Mashed Bananas: Add mashed ripe bananas for a naturally sweet, fruity addition. This works well with chocolate or vanilla pudding.
Combining Store-Bought and Homemade Elements
- Make a Homemade Cream Cheese Layer: As detailed earlier, blending cream cheese with powdered sugar and whipped topping creates a richer, contrasting layer.
- Homemade Crust or Base: Swap crushed cookies for homemade graham cracker crust crumbs to add a different texture.
- Top with Fresh Whipped Cream: Instead of using pre-packaged whipped topping, whip heavy cream with a bit of sugar for a light, airy topping.
Pro Tips for Success
- Chill for Better Flavor: Let the pudding sit in the refrigerator for at least an hour before assembling the dessert. This allows the flavors to meld.
- Layer Thoughtfully: Alternate between pudding, cookies, and toppings to ensure every bite has a balance of flavors.
- Sprinkle Some Salt: A tiny pinch of sea salt can enhance the sweetness and add a sophisticated depth to the dessert.
Calories and Nutritional Information for Dirt Pudding
Estimated Calorie Breakdown
The number of calories in dirt pudding depends on the ingredients and portion size. Here’s a general estimate for a standard recipe (serving size: 1 cup):
- Chocolate Pudding Mix (1/2 cup): ~150 calories
- Crushed Chocolate Cookies (1/4 cup): ~120 calories
- Cream Cheese (1 oz): ~100 calories
- Whipped Topping (1/4 cup): ~50 calories
- Gummy Worms (2 pieces): ~50 calories
Total Per Serving: Approximately 470 calories.
Healthier Substitutes for a Lighter Version
- Use Low-Fat Pudding Mix: Opt for sugar-free or low-fat pudding mixes to cut calories.
- Swap Whipped Topping: Replace whipped topping with low-calorie whipped cream alternatives or yogurt.
- Choose Whole-Wheat or Low-Calorie Cookies: Use reduced-sugar or whole-wheat cookies for a healthier “dirt” layer.
- Cut Down on Candy: Reduce or omit gummy worms to save on sugar.
Serving Size Recommendations
For parties or gatherings, serve dirt pudding in smaller portions like half-cup servings. This not only reduces calorie intake but also allows guests to enjoy other dishes without feeling too full.
Bonus Tip
To cater to dietary restrictions, consider making dairy-free or gluten-free versions of dirt pudding. Use almond milk for the pudding and gluten-free cookies for the “dirt.”
Fun Variations of Dirt Pudding
Kid-Friendly Variations with Themes
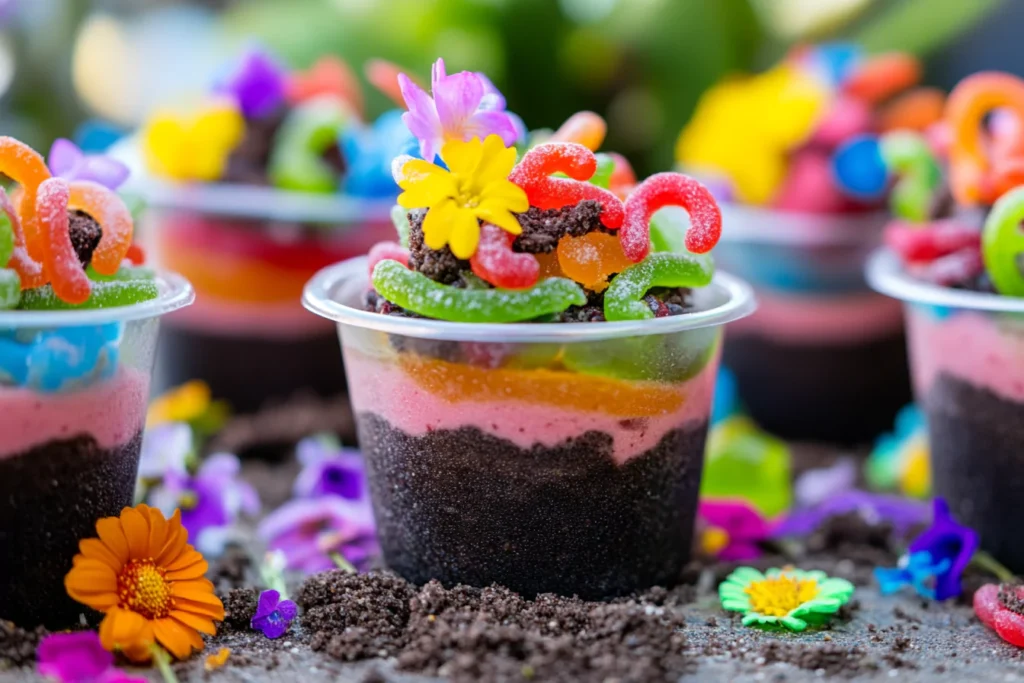
- Bug-Themed Dirt Cups: Add candy insects, edible flowers, or small chocolate rocks to the top layer for a nature-inspired twist. Perfect for garden-themed parties!
- Under the Sea Cups: Use vanilla pudding dyed blue with food coloring, crushed vanilla cookies as “sand,” and gummy fish for a beach-themed dessert.
- Monster Mash Cups: Add neon-colored frosting streaks and candy eyes to give your pudding a spooky, monster-like appearance.
Holiday-Themed Dirt Desserts
- Halloween Dirt Pudding: Top with crumbled orange and black cookies, candy pumpkins, and edible ghost shapes for a festive flair.
- Christmas Edition: Use white chocolate pudding as the base, green-dyed whipped topping for a “grass” effect, and decorate with red and green sprinkles or peppermint candies.
- Easter Garden Cups: Add pastel-colored gummy worms, candy eggs, and edible flowers for a spring-inspired dessert.
Elegant Options for Adults
- Tiramisu Dirt Pudding: Swap chocolate pudding for coffee-flavored pudding and layer with crushed ladyfingers instead of cookies. Dust with cocoa powder for a sophisticated finish.
- Mocha Delight: Mix chocolate pudding with a hint of espresso and layer with dark chocolate cookie crumbs. Top with chocolate shavings for a decadent treat.
- Berry-Chocolate Fusion: Add a layer of fresh raspberries or strawberries between the pudding and cookie layers for a fruity twist that balances the richness.
Pro Tip
Encourage creativity by setting up a DIY dirt pudding bar where guests can assemble their own unique versions using various toppings and flavors.
FAQs About Dirt Pudding
1. Why is My Dirt Pudding Runny?
Runny dirt pudding often results from:
- Incorrect Milk Ratio: Adding too much milk to the pudding mix.
- Insufficient Chilling Time: The pudding hasn’t had enough time to set in the refrigerator.
- Overmixing the Ingredients: This can break down the pudding structure.
How to Fix It:
- Adjust the milk-to-pudding ratio for a firmer consistency.
- Refrigerate for at least 2 hours before serving.
- Add more whipped topping or instant pudding mix to thicken it.
2. Where Did the Dirt Dessert Come From?
Dirt pudding originated in the United States and gained popularity during the 1980s. Inspired by whimsical presentations, the dessert is known for resembling garden soil, often topped with gummy worms to complete the illusion. Its playful appearance made it a favorite for children’s parties and creative culinary experiments.
3. How to Make Boxed Pudding Better?
You can enhance boxed pudding by:
- Adding Vanilla Extract: A teaspoon of vanilla boosts the flavor.
- Mixing in Melted Chocolate: Makes the pudding richer and more indulgent.
- Swapping Milk for Cream: Use half-and-half or a mix of milk and heavy cream for a thicker texture.
- Flavor Infusions: Add a pinch of cinnamon or instant coffee for a unique twist.
4. How Many Calories Are in Dirt Pudding?
The calorie count for dirt pudding varies based on ingredients and portion size. On average:
- Chocolate Pudding (1/2 cup): ~150 calories
- Crushed Cookies (1/4 cup): ~120 calories
- Whipped Topping (1/4 cup): ~50 calories
- Gummy Worms (2 pieces): ~50 calories
A typical 1-cup serving contains around 470 calories.
Healthier Substitutes: Use sugar-free pudding, low-fat whipped topping, and reduced-sugar cookies to cut calories.
Pro Tip
For a truly unique dessert, answer guests’ FAQs while serving by explaining the origins and variations of dirt pudding. It makes for a fun conversation starter!
Best Practices for Storing and Serving Dirt Pudding
How to Store Dirt Pudding for Freshness
- Refrigerate Immediately: Dirt pudding should always be stored in the refrigerator to maintain its creamy texture and prevent spoilage.
- Use an Airtight Container: Cover the dish with plastic wrap or transfer individual portions into airtight containers to keep it fresh and avoid absorbing other fridge odors.
- Shelf Life: Consume within 3–4 days for the best taste and texture. Beyond this time, the layers may begin to separate or lose their appeal.
Serving Tips for Maximum Enjoyment
- Chill Before Serving: Ensure the dessert has chilled for at least 2 hours. This allows the pudding to firm up and the flavors to meld together.
- Portion Creatively: Serve in clear glasses, mason jars, or mini pots for individual portions that showcase the beautiful layers.
- Add Toppings at the Last Minute: To keep gummy worms or decorative elements looking fresh, add them just before serving.
Creative Ways to Present Dirt Pudding
- Themed Presentation: For a garden theme, use small flowerpots lined with plastic wrap and top with edible flowers.
- Layer Showcase: Use transparent trifle bowls to highlight the pudding and cookie layers.
- Kid-Friendly Bowls: Add candy shovels as spoons for an interactive experience that kids will love.
Pro Tip
If you’re preparing dirt pudding for a party, assemble it the day before to save time. Just add the decorative toppings shortly before serving for a fresh, polished look.
Conclusion and Final Thoughts
Why Dirt Pudding is a Timeless Treat
Dirt pudding is more than just a dessert; it’s a delightful experience that brings smiles to both kids and adults. Its no-bake simplicity, playful appearance, and customizable flavors make it a go-to recipe for parties, potlucks, and family gatherings. Whether you’re creating a whimsical garden scene for kids or an elegant layered trifle for adults, dirt pudding never fails to impress.
Encourage Readers to Experiment and Share
The beauty of dirt pudding lies in its versatility. Feel free to experiment with flavors, toppings, and presentation styles to make it your own. Try incorporating healthier substitutes, festive decorations, or unique variations to suit your occasion.
If you enjoy combining flavors and textures in creative ways, you won’t want to miss our Brookie Recipe. It’s another fun, crowd-pleasing dessert that combines the richness of brownies with the crunch of cookies!
Print
The Best Dirt Pudding Recipe You’ll Ever Make!
- Total Time: 15 minutes + 2 hours chilling
- Yield: 8-10 servings 1x
- Diet: Vegetarian
Description
A fun, no-bake dessert that layers creamy chocolate pudding, crushed cookies, and gummy worms for a playful treat. Perfect for kids’ parties, potlucks, or a nostalgic sweet treat!
Ingredients
Main Ingredients
- 1 box (3.9 oz) chocolate pudding mix (JELL-O or preferred brand)
- 2 cups cold milk (whole milk recommended for creaminess)
- 8 oz cream cheese (softened)
- ½ cup powdered sugar
- 8 oz whipped topping (Cool Whip or homemade)
- 1 package (14 oz) chocolate sandwich cookies (Oreos, crushed)
- Gummy worms (for decoration)
Optional Add-Ins
- ½ cup peanut butter (for a nutty twist)
- ½ cup shredded coconut (to resemble straw or grass)
- ¼ cup chopped nuts (pecans, almonds for crunch)
- Candy rocks (for a fun garden effect)
Instructions
Prepare the Pudding Base
- In a bowl, whisk together chocolate pudding mix and cold milk for 2-3 minutes.
- Let it sit for 5 minutes to thicken.
Make the Cream Cheese Layer
- In another bowl, beat cream cheese and powdered sugar until smooth.
- Gently fold in whipped topping to create a light, creamy layer.
Crush the Cookies
- Place Oreos in a plastic bag and crush them using a rolling pin or food processor until they resemble dirt.
- Set aside a portion for topping.
Assemble the Dirt Pudding
- In a large dish or individual cups, layer chocolate pudding, cream cheese mixture, and crushed cookies.
- Repeat the layers until the dish is full, ending with cookie crumbs on top.
Decorate and Chill
- Add gummy worms and other fun toppings to resemble dirt.
- Cover and chill for at least 2 hours before serving.
Notes
- For Firmer Pudding: Use less milk or chill for longer.
- For a Healthier Version: Use low-fat pudding, Greek yogurt instead of cream cheese, and reduced-sugar cookies.
- Make Ahead: Can be prepared a day in advance—just add toppings before serving!
- For a Themed Party: Serve in mason jars, small flower pots, or clear cups to showcase the layers.
- Prep Time: 15 minutes
- Cook Time: None (No-bake)
- Category: Dessert
- Method: No-Bake
- Cuisine: American
Nutrition
- Serving Size: Per Serving - 1 Cup
- Calories: 470 kcal
- Sugar: 35g
- Fat: 22g
- Carbohydrates: 55g
- Fiber: 2g
- Protein: 7g
2 thoughts on “The Best Dirt Pudding Recipe You’ll Ever Make!”