There’s something magical about the aroma of freshly baked bread filling the kitchen. It’s warm, inviting, and feels like a cozy hug in food form. But what if you could take that comforting experience and elevate it? Enter the garlic butter bun—a heavenly combination of soft, pillowy bread infused with rich, buttery garlic flavor.
I still remember the first time I made these. It was a chilly evening, and I wanted something warm to pair with my soup. I had a loaf of bread, but it felt… plain. That’s when I decided to experiment. A little garlic, a generous amount of butter, and some patience—and the result? The most irresistible garlic butter bun that became an instant favorite in my home.
But here’s the thing—making the garlic butter bun is much easier than most people think. And today, I’ll guide you through everything you need to know to get those golden, buttery beauties just right.
What is a Garlic Butter Bun?
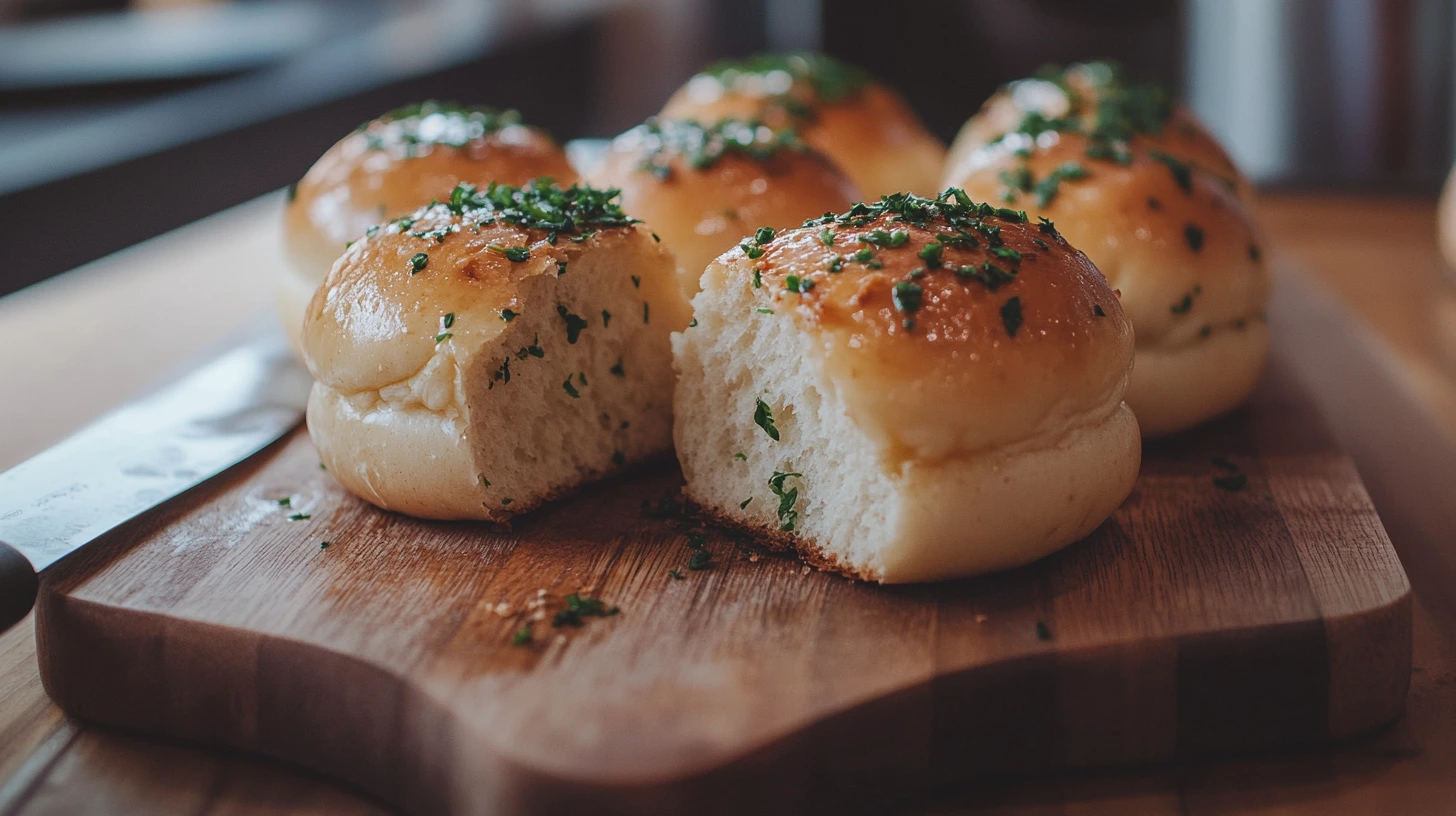
A garlic butter bun is exactly what it sounds like—a soft, fluffy bread roll brushed with a buttery garlic topping. It’s baked to golden perfection, making it the perfect side for pasta, soups, or even enjoyed on its own.
But there’s more to it than just mixing ingredients and baking. The secret to the best garlic butter bun lies in the perfect dough, the right balance of garlic, and that golden, buttery finish that makes every bite melt in your mouth.
What Makes a Garlic Butter Bun So Special?
✔ Soft & Fluffy: The dough is carefully kneaded to create an airy texture.
✔ Rich Garlic Flavor: Infused with fresh garlic, each bite bursts with flavor.
✔ Golden & Buttery: A generous brushing of butter gives it that irresistible shine.
✔ Versatile: Perfect as a side, snack, or even a sandwich base.
Why You’ll Love This Recipe
Still unsure if making garlic butter buns at home is worth it? Here’s why this recipe will become your go-to bread recipe:
- Better Than Store-Bought: Most store-bought garlic bread is either too dry or lacks flavor. Making it at home ensures a perfect balance of softness and taste.
- No Fancy Ingredients Needed: Everything you need is likely already in your kitchen.
- Beginner-Friendly: Even if you’ve never baked before, this recipe is simple and straightforward.
“Baking is not just about following a recipe; it’s about creating an experience. And trust me, making your own garlic butter bun is an experience you won’t forget.”
The Secret to Making the Best Garlic Butter Bun
While the process of making a garlic butter bun is easy, a few key details make all the difference.
The Right Flour for the Softest Texture
Not all flours are created equal. To achieve the pillowy softness of a garlic butter bun, using bread flour instead of all-purpose flour is ideal. Bread flour has a higher protein content, which gives the buns their light and airy texture.
Pro Tip: If you only have all-purpose flour, add a teaspoon of vital wheat gluten for better results.
Choosing the Best Butter for Rich Flavor
Butter plays a starring role in this recipe. Always opt for unsalted, high-quality butter to allow the garlic’s natural flavor to shine. If using salted butter, adjust the additional salt in the recipe accordingly.
Did You Know? European butter contains more fat than regular butter, giving the garlic butter bun a richer flavor.
Fresh Garlic vs. Garlic Powder: Which is Better?
Fresh garlic always wins when it comes to making the perfect garlic butter bun. It adds an authentic, pungent aroma that garlic powder simply can’t replicate. However, if you prefer a milder taste, garlic powder is a decent alternative.
Quick Tip: Roast the garlic before mixing it with butter for a deep, caramelized flavor.
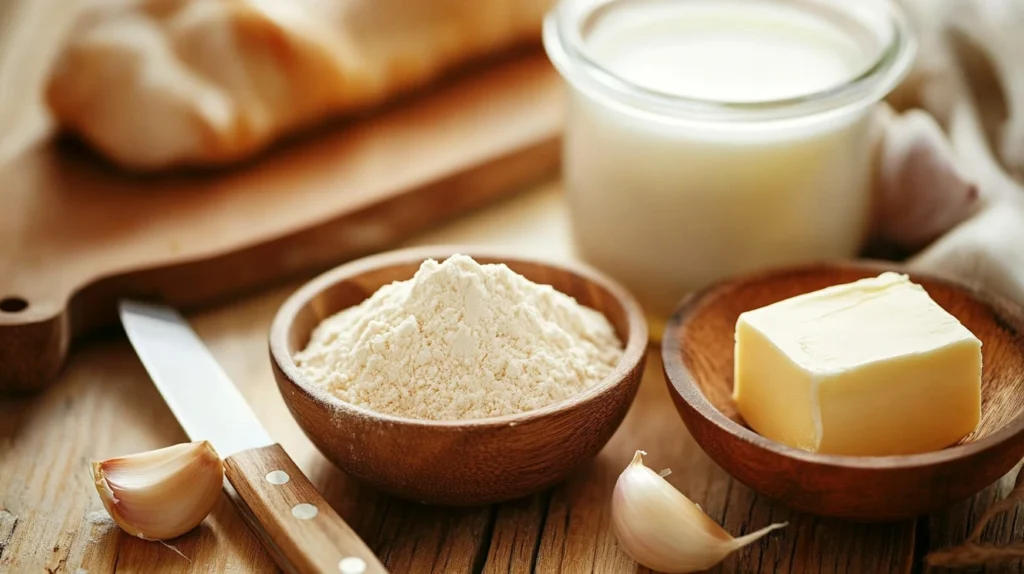
Essential Ingredients for Garlic Butter Bun
Before diving into the step-by-step process, let’s go over what you’ll need:
| Ingredient | Purpose |
|---|---|
| Bread flour | Creates a soft and airy texture |
| Yeast | Helps the dough rise and become fluffy |
| Warm milk | Adds richness and softness |
| Sugar | Feeds the yeast for proper fermentation |
| Butter | Enhances flavor and gives a golden finish |
| Garlic | The star ingredient for a bold taste |
| Egg | Provides structure and softness |
| Salt | Balances and enhances the flavors |
| Parsley (optional) | Adds color and freshness to the buns |
(Full ingredient quantities and measurements are available in the recipe card below.)
Step-by-Step Guide to Making Garlic Butter Buns at Home
Now that we have all the ingredients ready, let’s start making the most delicious garlic butter buns from scratch.
Step 1: Preparing the Dough
A good dough is the foundation of a soft garlic butter bun. Here’s how to get it right:
- Activate the yeast: Mix warm milk, sugar, and yeast in a bowl. Let it sit for 5-10 minutes until foamy. This means the yeast is alive and ready to work.
- Combine dry ingredients: In a large mixing bowl, whisk together the bread flour and salt.
- Mix wet ingredients: Add the yeast mixture, melted butter, and a beaten egg into the flour. Stir until the dough starts to come together.
Troubleshooting: If the yeast doesn’t foam up, it’s likely expired or the milk was too hot, killing the yeast.
Step 2: Kneading for the Perfect Texture
Kneading is where the magic happens. It helps develop gluten, which gives the garlic butter bun its soft and stretchy texture.
- Hand kneading: Transfer the dough onto a floured surface and knead for 8-10 minutes until it becomes smooth and elastic.
- Using a stand mixer: If using a dough hook, knead on medium speed for 5-7 minutes.
- Check for readiness: Perform the “windowpane test” by stretching a small piece of dough. If it stretches without tearing, it’s ready.
“A well-kneaded dough is like a good friendship—it’s flexible, strong, and full of potential.”
Step 3: First Rise – Letting the Dough Develop Flavor
The first rise is where all the magic happens. This is when the yeast works its magic, creating air pockets that will make the garlic butter bun light and fluffy.
How to Let the Dough Rise Properly:
- Grease a large bowl with a little oil and place the dough inside.
- Cover with a damp cloth or plastic wrap to prevent drying.
- Let it rise for about 1-2 hours in a warm place until it doubles in size.
Pro Tip: If your kitchen is cold, place the dough inside a slightly warmed oven (turned off) or near a warm spot.
Troubleshooting: If the dough isn’t rising, your yeast might be expired, or the room is too cold. Give it more time or place it in a warmer spot.
Step 4: Shaping and Second Rise
Once the dough has doubled in size, it’s time to shape the buns. This step ensures uniform baking and the perfect texture.
How to Shape the Perfect Buns:
- Punch down the dough gently to release excess gas.
- Divide it into equal portions (about 12-15 pieces, depending on your preferred size).
- Roll each piece into a smooth ball by tucking the edges underneath.
- Arrange on a baking tray lined with parchment paper, keeping some space between them.
- Let them rise again for another 30-45 minutes until puffy.
Why is the second rise important? It allows the dough to relax and ensures a soft, fluffy garlic butter bun after baking.
Step 5: Making the Garlic Butter Topping
This is where we take things to the next level! The garlic butter is what makes these buns truly unforgettable.
How to Make the Best Garlic Butter:
- Melt the butter in a small pan over low heat.
- Add freshly minced garlic and cook for 30 seconds until fragrant (do not burn!).
- Stir in chopped parsley for extra flavor and color.
- Optional: Add a pinch of salt and grated parmesan for an even richer taste.
Pro Tip: If you love intense garlic flavor, use roasted garlic instead of fresh garlic—it adds a deeper, slightly sweet taste.
Step 6: Baking to Golden Perfection
Now comes the most exciting part—baking your garlic butter bun to perfection!
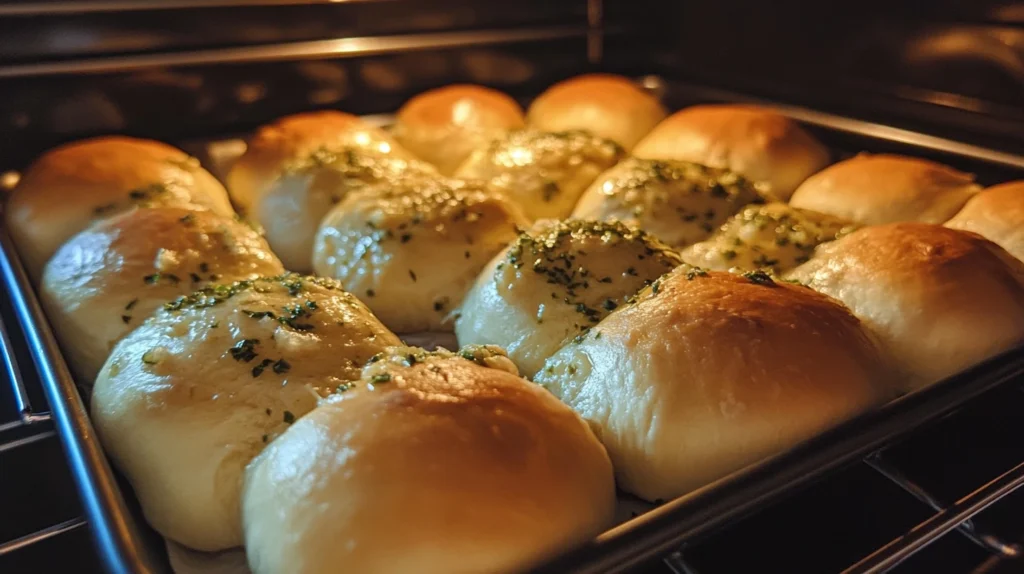
Baking Instructions:
- Preheat the oven to 375°F (190°C).
- Brush the buns with an egg wash (beaten egg + a little milk) to get that glossy finish.
- Bake for 15-18 minutes until golden brown and fully cooked inside.
- Immediately brush with garlic butter while they’re hot to let the flavors soak in.
Did You Know? Brushing butter while the buns are hot allows it to absorb better, making every bite rich and flavorful.
Step 7: Brushing with Garlic Butter for the Ultimate Taste
As soon as the buns come out of the oven, give them another generous coating of garlic butter. This step enhances both the aroma and taste.
“A perfect garlic butter bun isn’t just baked—it’s bathed in buttery goodness.”
Let them cool slightly before serving, but don’t wait too long—these are best enjoyed warm and fresh!
Tips for Making the Best Garlic Butter Buns
How to Make Buns Extra Soft
✔ Use bread flour for better gluten development.
✔ Don’t overbake—remove them as soon as they turn golden.
✔ Cover them with a cloth after baking to keep them soft.
Achieving the Right Amount of Garlic Flavor
✔ Use fresh garlic for a strong aroma.
✔ Roast the garlic first for a sweeter, milder taste.
✔ Adjust the amount based on your preference.
Avoiding Dry or Dense Buns
✔ Knead the dough properly to develop gluten.
✔ Allow both rises to happen fully.
✔ Make sure your yeast is active before starting.
Common Problems and Solutions
Even the best bakers face issues—here are some common problems and how to fix them:
Why Did My Dough Not Rise Properly?
❌ Expired yeast → Use fresh yeast and activate it in warm milk.
❌ Cold environment → Let it rise in a warm place.
Why Are My Buns Too Hard?
❌ Overbaking → Take them out as soon as they turn golden brown.
❌ Not enough moisture → Cover with a damp cloth after baking.
Why Does My Garlic Butter Taste Bitter?
❌ Burnt garlic → Sauté on low heat for just 30 seconds.
❌ Too much garlic → Adjust to taste and use roasted garlic for milder flavor.
What to Serve with Garlic Butter Buns
These buns are perfect with:
✔ Soups (Tomato, Mushroom, Chicken Broth)
✔ Pasta Dishes (Spaghetti, Alfredo, Carbonara)
✔ Grilled Meats (Steak, BBQ, Roasted Chicken)
How to Store and Reheat Garlic Butter Buns
Want to keep them fresh for later? Here’s how:
✔ Store in an airtight container at room temperature for 2-3 days.
✔ Reheat in the oven at 350°F (175°C) for 5 minutes.
✔ Microwave for 10 seconds to soften.
Freezing Tip: Freeze unbaked buns after shaping, then thaw and bake fresh!
Nutritional Information
| Nutrient | Per Serving |
|---|---|
| Calories | 210 kcal |
| Carbohydrates | 28g |
| Protein | 5g |
| Fats | 9g |
| Saturated Fat | 5g |
| Sodium | 290mg |
| Fiber | 1g |
(Nutritional values are approximate and vary based on ingredients used.)
Final Thoughts: Why You Should Try This Garlic Butter Bun Recipe
If you’ve never made a garlic butter bun from scratch before, now is the time! They’re soft, buttery, and packed with rich garlic flavor. Plus, the satisfaction of baking your own bread is unbeatable.
Whether you’re making them for a family dinner or just to enjoy with a hot cup of tea, these buns will always be a hit. And if you love baking, why not try something different? You might enjoy making Old English Pizza Bridesburg—a unique and flavorful dish that pairs perfectly with these buns!
“Homemade bread isn’t just food—it’s a warm hug in the form of dough.”
The Ultimate Garlic Butter Bun Recipe
- Total Time: 2 hours
- Yield: 12 buns
- Diet: Vegetarian
Description
Soft, buttery, and packed with rich garlic flavor, these homemade Garlic Butter Buns are perfect as a side dish or a snack! They’re easy to make and irresistibly delicious.
Ingredients
For the Dough:
- Bread flour
- Active dry yeast
- Warm milk
- Sugar
- Butter
- Egg
- Salt
For the Garlic Butter Topping:
- Butter
- Fresh garlic (minced)
- Parsley (chopped)
(Full ingredient quantities and measurements in the instructions below.)
Instructions
1. Prepare the Dough
- In a small bowl, combine warm milk, sugar, and yeast. Let it sit for 5-10 minutes until foamy.
- In a large mixing bowl, whisk together bread flour and salt.
- Add the yeast mixture, melted butter, and a beaten egg into the flour. Mix until the dough comes together.
2. Knead the Dough
- Knead the dough on a lightly floured surface for 8-10 minutes until smooth and elastic.
- If using a stand mixer, knead with a dough hook for 5-7 minutes on medium speed.
- Place the dough in a greased bowl, cover it with a cloth, and let it rise for 1-2 hours until doubled in size.
3. Shape and Second Rise
- Punch down the dough and divide it into equal portions.
- Roll each piece into a ball and place them on a parchment-lined baking sheet.
- Cover and let them rise again for 30-45 minutes until puffy.
4. Make the Garlic Butter
- In a small pan, melt butter over low heat.
- Add minced garlic and sauté for 30 seconds until fragrant.
- Stir in chopped parsley and set aside.
5. Bake the Buns
- Preheat the oven to 375°F (190°C).
- Brush the buns with egg wash and bake for 15-18 minutes until golden brown.
- Remove from the oven and immediately brush with the garlic butter mixture.
6. Serve & Enjoy
Let the buns cool slightly before serving. Best enjoyed warm!
Notes
- Make it extra soft: Use bread flour for the best texture.
- For a deeper flavor: Try roasting the garlic before adding it to the butter.
- Storing: Keep in an airtight container for up to 3 days. Reheat in the oven at 350°F (175°C) for 5 minutes.
- Freezing: Freeze shaped dough balls before baking. Thaw and bake fresh!
- Prep Time: 15 minutes
- Cook Time: 18 minutes
- Category: Dinner
- Method: Baking
- Cuisine: international
Nutrition
- Calories: 210 kcal
- Sodium: 290mg
- Fat: 9g
- Saturated Fat: 5g
- Carbohydrates: 28g
- Fiber: 1g
- Protein: 5g